快速开始
在开始本章前,我们假定您熟悉 gRPC-go 的基础使用方法,以及 Go 语言语法。
环境要求:bash && go version >= go 1.11
1. 带您开启一次gRPC调用
1.1 server 端
-
定义IDL (接口描述 .proto文件):
新建sever文件夹,作为server端项目的根目录
server文件夹下新建helloworld.proto, 写入以下内容作为接口描述,该内容定义了一个接口名为Greeter,包含SayHello方法,以及请求参数HelloRequest 和返回参数HelloReply 的定义。
syntax = "proto3";

option go_package = "glory/main";
package main;

service Greeter {
  rpc SayHello (HelloRequest) returns (HelloReply) {}
}

message HelloRequest {
  string name = 1;
}

message HelloReply {
  string message = 1;
}
(可选)在当前目录下执行
$ protoc --go_out=plugins=grpc:. *.proto会发现在同级目录下生成helloworld.pb.go文件
如果您没有安装 protoc 和 protoc-gen-go 工具,上述命令将会报错。(或者因为您懒得敲命令)我们推荐您直接使用我们提供的在线pb生成工具,将上述代码拷贝入 grpc 编译器,手动将编译结果拷贝到同级目录的helloworld.pb.go文件内。
-
撰写配置文件
在server文件夹下新建config文件夹,新建glory.yaml配置文件如下
server/config/glory.yaml
org_name: glory # 必填,服务所属组织,内容随意 server_name: grpc-demo-server # 必填,服务名,内容随意 log : # 日志配置 "console-log": log_type: console # 命令行输出日志 level: debug # 日志等级 provider: # 服务端配置 "gloryGrpcService": # service 名称可自定义 # service_id: glory-grpc-provider # 服务ID,用于服务发现,目前没用到 protocol: grpc # 选择grpc协议暴露 port: 8080 # 暴露端口 -
建立server/main.go文件
package main import ( "context" // 开启框架服务实例必须引入 "github.com/glory-go/glory/glory" // 使用日志组件必须引入 "github.com/glory-go/glory/log" // 注册服务端service必须引入 "github.com/glory-go/glory/service" ) // server is used to implement helloworld.GreeterServer. type server struct { } // SayHello implements helloworld.GreeterServer func (s *server) SayHello(ctx context.Context, in *HelloRequest) (*HelloReply, error) { log.Info("Received: %v", in.GetName()) return &HelloReply{Message: "Hello " + in.GetName()}, nil } func main() { // 开启服务实例,一个程序只需要一个gloryServer即可,一个server上可以注册不同协议的一个或多个glory service,再统一暴露。 gloryServer := glory.NewServer() // 实例化配置,此处gloryGrpcService对应glory.yaml配置文件中的service 名称,glory框架通过改服务名选择对应配置进行实例化 gloryService := service.NewGrpcService("gloryGrpcService") // 注册用户定义的实例化grpc服务结构到grpc组件上。 RegisterGreeterServer(gloryService.GetGrpcServer(), &server{}) // 注册当前grpc service 到gloryserver上 gloryServer.RegisterService(gloryService) // 启动glory server,如有多个service注册到当前server,则会一并启动 gloryServer.Run() } -
执行下述脚本,开启 gomod 拉取依赖
go mod init glory-grpc-server-demo
export GOPROXY="https://goproxy.cn"
go get ./...
拉取依赖时间较长,请耐心等候
go get成功后如果ide报错,尝试重启goland
如果还是爆红,尝试在goland-setting-go-gomodules-environment 配置GOPROXY环境变量。
-
运行服务
$ go run .可看到控制台输出:
$ go run .
config center info: can't load config center config at config/config_center.yaml
grpc start listening on :8080
代表gRPC服务启动成功
1.2 client 端
-
server同级目录下建立client文件夹,定义IDL (接口描述语言)helloworld.proto,文件内容与server端完全一致。相同方法编译生成.pb.go文件,可以直接将server的拷贝过来。
-
撰写配置文件
client/config/glory.yaml
org_name: glory # 必填,服务所属组织,内容随意 server_name: grpc-demo-client # 必填,服务名,内容随意 log : # 日志配置 "console-log": log_type: console # 命令行输出日志 level: debug # 日志等级 consumer : "grpc-helloworld-demo": # service 名称可自定义 # service_id: glory-grpc-provider # 服务ID,用于服务发现,目前没用到 server_address: 127.0.0.1:8080 # 服务端地址 protocol: grpc # 选择grpc协议暴露 -
main.go
package main import ( "context" // grpc客户端需引入 "github.com/glory-go/glory/grpc" // 框架日志组件引入 "github.com/glory-go/glory/log" ) func main() { // 从配置生成glory-grpc客户端,与配置中serviceName对应 client := grpc.NewGrpcClient("grpc-helloworld-demo") // 与协议文件结合,通过glory-grpc客户端拿到grpc原生Conn,生成grpc client greeterClient := NewGreeterClient(client.GetConn()) // 发起rpc调用,传递参数 reply, err := greeterClient.SayHello(context.Background(), &HelloRequest{ Name: "grpcDemo", }) if err != nil { panic(err) } // 打印结果 log.Infof("reply = %+v", reply) } -
和server端完全一样,拉取依赖
go mod init glory-grpc-client-demo export GOPROXY="https://goproxy.cn" go get ./... -
运行服务
$ go run .可看到控制台输出:
2021-06-09T14:43:35.560+0800 info client/main.go:27 reply = message:"Hello grpcDemo"gRPC调用成功
2.1 运行一个简易 http-server
新建一个 http-server 目录存放项目
http-server/config/glory.yaml
org_name: glory # 必填,服务所属组织,内容随意
server_name: http-demo-server # 必填,服务名,内容随意
log : # 日志配置
  "console-log":
    log_type: console # 命令行输出日志
    level: debug # 日志等级

provider:
  "httpDemo":
    protocol: http
    # service_id: GoOnline-IDE-gloryService # 服务ID,用于服务发现,目前没用到
    port: 8080
http-server/main.go
package main

import (
	"github.com/glory-go/glory/glory"
	ghttp "github.com/glory-go/glory/http"
	"github.com/glory-go/glory/log"
	"github.com/glory-go/glory/service"
)

type gloryHttpReq struct {
	Input    []int  `schema:"input" validate:"required"` // query参数使用schema 标签
	BodyStr  string `json:"body_str"`                    // body 参数使用json标签
	BodyStr2 string `json:"body_str_2"`                  // body 参数使用json标签
}

// 定义 response 结构体
type gloryHttpRsp struct {
	Output int `json:"output"`
}

// 自定义业务逻辑处理 handler
func testHandler(controller *ghttp.GRegisterController) error {
	req := controller.Req.(*gloryHttpReq)
	rsp := controller.Rsp.(*gloryHttpRsp)
	log.Info("req = ", *req)                                                                     // 打印query和body参数
	log.Info("hello = ", controller.VarsMap["hello"], " hello2 = ", controller.VarsMap["hello2"]) // 打印path内变量
	rsp.Output = req.Input[0] + 1
	return nil
}

func main() {
	gloryServer := glory.NewServer()
	// 与 yaml文件中的key保持一致
	httpService := service.NewHttpService("httpDemo")
	// 注册http服务注册:path, handler, bodySturcture, method, filter...
	httpService.RegisterRouter("/test/{hello}/{hello2}", testHandler, &gloryHttpReq{}, &gloryHttpRsp{}, "POST")
	// 注册service到glory服务
	gloryServer.RegisterService(httpService)
	// 开启glory server
	gloryServer.Run()
	// 使用postman测试
}
拉取依赖开启服务并测试
go mod init glory-grpc-http-demo
export GOPROXY="https://goproxy.cn"
go get ./...
$ go run .
config center info: can't load config center config at config/config_center.yaml
[negroni] listening on :8080
服务开启成功,使用postman请求以下结构:
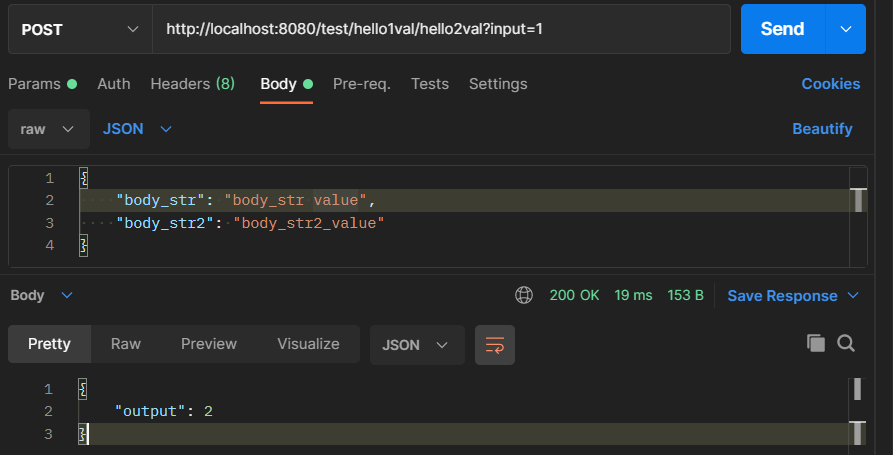
可观察到收到返回包output = 2, 在server端可以看到打印出的请求信息:
[negroni] listening on :8080
2021-06-09T15:13:41.960+0800    info    http-server/main.go:25  req = {[1] body_str value }

2021-06-09T15:13:41.976+0800    info    http-server/main.go:26  hello = hello1val hello2 = hello2val

[negroni] 2021-06-09T15:13:41+08:00 | 200 |      17.3631ms | localhost:8080 | POST /test/hello1val/hello2val
2.2 运行一个简单的websocket server
与上述http server的配置文件完全相同
service启动时使用 RegisterWSRouter 接口, 并注册对应hansler即可
package main

import (
	"github.com/glory-go/glory/glory"
	ghttp "github.com/glory-go/glory/http"
	_ "github.com/glory-go/glory/registry/redis"
	"github.com/glory-go/glory/service"
)

type gloryWSReq struct {
	BodyStr  string `json:"body_str"`   // body 参数使用json标签
	BodyStr2 string `json:"body_str_2"` // body 参数使用json标签
}

type gloryWSRsp struct {
	BodyStr  string `json:"body_str"`   // body 参数使用json标签
	BodyStr2 string `json:"body_str_2"` // body 参数使用json标签
}

// 自定义业务逻辑处理 handler
func testWSHandler(controller *ghttp.GRegisterWSController) {
	req := &gloryWSReq{}
	rsp := &gloryWSRsp{}
	controller.WSConn.ReadJSON(req)
	/*
		your code
	*/
	controller.WSConn.WriteJSON(rsp)
}

func main() {
	gloryServer := glory.NewServer()
	httpService := service.NewHttpService("httpDemo")
	httpService.RegisterWSRouter("/test/{hello}/{hello2}", testWSHandler)
	gloryServer.RegisterService(httpService)
	gloryServer.Run()
}
3.1 关于配置文件
框架默认使用 “./config/glory.yaml"作为配置文件
- 如果您希望通过配置中心读取配置,请参考示例// todo
- 如果您希望修改配置路径,或者通过IDE启动项目,设置修改环境变量 GLORY_CONFIG_PATH=“您的glory.yaml文件路径”
- 如果您希望根据环境区分配置,请参考示例// todo
下一篇: 示例说明